Got my exhaust back and put it on. They did nice work! I also had them make me up a set of exhaust shrouds for both carb heat and cabin heat. Everything finally fits after setting out to mount the airbox. The oil tank fits nicely on the right hand side. Cowling is about fitted, need some #6 camloc's. I thought #5's would work but some of them are just too short. Rolled it out tonight once I had the exhaust on to put the prop and spinner on for motivational sake. Took these photo's. Primer should arrive sometime next week.
Gotta keep going and "get-r-done".
Paul, PA
Last edited by b1x4nqb on Sun Aug 31, 2008 8:42 am, edited 1 time in total.
Paul,
Wow, looks great!
The airbox fit up looks like a 'pro' job. I'm envious, but I think it falls into the "renovations-down-the-line" category for me.
I need to finish the wings and get this bird painted.
Are those the standard main tires? The ones supplied on my kit are 'Air-Trac' 8.50-6 and have tread grooves.
The tires are Goodyear Aircraft Tires. They are a size 26x10.5-6 smooth tubeless. To be totally honest I ljust loved the look but argued with myself that they would be the way to go with operating out of the front yard and adjacent fields. I park the plane through a 7x9 garage door by backing it in. With the prop turned in a certain position (like the photo) I need to lift the tail to clear the entrance before lowering it again. Never thought I'd have that issue. The extra tire size contributed to that minor inconvenience. I will always have to keep an eye out when parking it.
The airbox was a large project in and of itself. Finally getting it in and getting everything to fit is a relief. Going to buy some angle bracket material to mount the oil tank, oil cooler, etc. Also finishing up a few tapes that are around the handle in the back, etc. Need to build a paint booth tomorrow.
Paul,
Nice job! Looks great!
I have a couple of questions. Is that the standard engine mount? What did you do to get the air box to fit? Is that a custom exaust? It really looks nice. I intended to build a 4 into 1 but if I don't have to reinvent it I could spend the time doing other things.
Dan
BTW - I talked with those folks about two weeks ago when I bought my heat shroud. Apparently they've made some upgrades to the muffler system to 1) drastically reduce noise an 2) set it up so it doesn't blast the gear. FWIW
Looks great Paul. I hope you used the "right" lord mounts for the 912uls. At 54 hours now the front two on mine are really showing wear. I am putting it off as long as I can in replacing them.
Keep going!
Dennis
Live as though you were going to die tomorrow, learn as though you were going to live forever...
Kevin is right, it was made from aircraftexhaust. Also, the mount is the standard one from the factory. Because Troy refused to take the time to make me up a modified mount I was forced to modify the L brackets. In turn I also had to modify the engine mount (crossover diagonal), the cowling, both rear coolant lines, and of course the exhaust. Actually the exhaust was one of the first 4 made and had multiple revisions since I got mine. I had issues from the start and it wouldn't fit without hitting my engine mount before these changes. The designed was great to work with and took the time to have mine updated to the current adjustments that are being designed into new exhausts built today. After just getting it back and after making these other changes while it was out for adjustment, I'm happy to report a perfect fit. To summerize I had to push the engine out 1.5 inches, raise it .5 inches, cut out a center section of the diagonal support in the center of the engine mount then weld on a new piece to support the chopped out piece, have 1.5 inches added to the cowling rear, replace the 2 rear coolant pump outlets to straight outlets from bent ones, extend the hoses coming off these to allow the extension, and finally make sure the exhaust had the proper clearance. Troy told me about an experiment where they tilted the engine up 3 degrees in the front and it apparently made a huge difference in the takeoff performance. I therefore took this into consideration when drilling new holes in the L brackets. It was only about 1/8 inch difference for me. I went on the conservative side and raised the front up 5/8 vs the rear 1/2 inch.
When I pointed out the issue with hitting the exhaust gases on the crossover bars on the gear, Mark (the designer) said their is no issue with them being hit from a structural standpoint and that the gases are designed to pass over the bar. I'm going to try it and adjust later if necessary. For now, I'm shooting for "Get-R-Done". As for the quietness, Mark also said it was designed for performance so I'm going to see how bad it is and again, adjust if needed. I have my eye on an aftermarket "super trap" exhaust if I need to adjust it. Also, I placed a black neoprene type of insulation in between the skin from the firewall to the rear of the baggage area. This was based off the quietness from doing the same thing in another Highlander that Troy built. Troy said it weighed very little but made a world of difference. We'll see. Was a pain in the neck to install.
Dennis, I ordered 6 new Green "Firm" mounts from LEAF yesterday. I called them because they had another one that was labelled "Hard" for $2 more. They said that # came back to the Firm ones so I ordered six of them. I'm bighting the bullet! I hate to waste 6 good ones but they won't take them back. For the sake of $50 I don't want to have to replace them for awhile. I also sanded down the L bracket hole edges (bottom and top) to try to do everything I can to prevent the edges from having a sharp edge to bite with when vibrating.
Those mounts look vaguely familiar. Plane looks great, I like how the exaust and airbox came out. It seems like every new picture I see on this site brings up one more great idea. Everyone ends up being a pioneer for those to follow.
I got my new exhaust on yesterday the tuned 4 into 1 yall are talking about help performance alot but it is loud as heck. about like a 4 cylinder dirt track race car. i can live with the noise for the added power. thanks billy
These last few weeks have seen little work on the plane. I did manage to get a Supertrap exhaust tip on to quiet it down some based off others reviews. I know of one other Highlander with one and I really liked the sound of it.
Today I started mounting the oil cooler but got delayed when I needed parts (see other post). Tonight I also managed to set up the panel to begin mounting it. I'll try to set it permanently tomorrow sometime. The sides of the top panel still need trimming down to the boot cowl but it is coming together nicely.
Managed to plumb in the oil and radiator lines this afternoon. Also placed the thermostat and overflow coolant bottle.
I'm looking for a manifold for my fuel pressure switch. I need to "T" into the fuel line but I can't seem to locate something in brass, etc with a female fitting on the side yet barbs on both ends. Anybody have a source? Hopefully I can finish off the fuel lines next then get the panel tied into it all.
I'm also trying to get the right barbs for a facet fuel pump from spruce. They didn't know what threads and the barbs I bought from them seem to not go in all the way. I have a fuel flow meter I also need to buy these dog gone barbs for and the thread thing has me baffled.
Paul, PA
UPDATE Wicks has a person downstairs that was great to work with and found my parts.
If you have a Facet Fuel Pump -You need 2 of Part # 1537 to give you two barbs on each end for 1/4" id fuel hose
If you have a Floscan model 210 -You need 2 of Part #1581 to give you barbs for it
If you have a Westach Fuel Pressure sender model 387-16v2-You need 1 of Part # 3700x2 for the T fitting, and 2 of Part # 1537 (again) for the barbs.
Last edited by b1x4nqb on Mon Aug 25, 2008 1:01 pm, edited 1 time in total.
Lookin' great Paul, wish I could help you with the thread issues. We had similar challenges with threads with our milspec lines. A busy high performance/racing shop was very helpful to us, as they'd just look at some fitting and say, "Oh that's a ____ and you need a ____" ,every time.
Mounted the prop today and spinner today. Also filled the coolant and oil tanks. I made a real mess with the oil. The thermostat was confusing to be sure it was mounted properly and when I tried to prime the system and get oil to come out the pump housing I spun the prop by hand at least 100 times with no oil coming out. I remembered Scuba having the same issue and it being the way he plumbed his thermostat. Finally I figured out that I was pumping oil back into the holding tank. I then drained about a quart out and got it everywhere. Then I reprimed the oil cooler with fluid but this time with the hose directly leaving the oil holding tank(not from the thermostat hose). Instant oil out the pump housing! :) . I let it get two more funnels worth and sealed it off.What a mess though. I felt like I dropped two bucks worth of oil into the dirt. Needless to say I need to order more for the future.
Tonight I worked on the instrument wiring and the firewall. I was drilling a hole into that steel firewall and the drill caught and gave me a knot in the forehead. I waxs cursing at the moths and crickets outside. I thought I was getting tired until I decided to see if the hole I drilled was free of rough edges and I cut deep under my nail! Man did that sting! That was it, I made up a workshop bandaid and called it a night. Tomorrows another day.
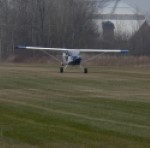
Here is a shot from the 4th of July. It really doesn't show it all but gives you the idea.
A second shot of the thermostat and engine for those that may plumb one in to there's in the future to help take out the guesswork.
The third shows that I only clear the 7ft door by an inch or two at most. I dropped the pressure in my tires down to 7lbs a side to help get out. I'll have to put in screws like Troy does to help prevent slippage. Did anybnody else do this? How long a screw did you use? As it is, I clear the 9ft width by only a few inches as well. I installed a winch in my shop and I pull it in by that so I can make sure it comes in straight. I used to have to sweat it every inch before. Now I just push the button and watch it pull in.