

Paul,
I am about to close my second Zenair 1450 straight float and am starting to think about rigging. From everything I read there are four things that I need to be concerned with:
Distance between floats;
Height above floats;
Angle between datum and floats; and
Fore/aft position of the airframe on the floats.
For the distance between floats one rule I read was 40-50% of the length of the float. My floats are 184" long not including the rudder and 27" wide, so 50% would be 92" on center and 40% would be 73" on center. I read that the wider the stance of the floats the easier it will be to handle cross winds and I surmise that the wider they are the heavier the installation will be due to longer spreader bars and struts. The center of my axles on extreme gear are 72' wide which has a nice appearance so if I centered the floats at 73" the total width outside edge to outside edge would be close to 100", is that too narrow? What do you recommend?
The second measurement is the height above floats. For this I am going to shoot for the 74.8" Kiev blade tips to be 18" above the water. Is this a good figure?
The third measurement is the angle between datum and floats. I read in a previous post that you recommend a throat angle of 1.5 - 3.5 degrees. Is that the angle between the floats and the top door jamb when level? Do you know what the angle of incidence is on the Highlander, I may have misread but In one post Dane said that it was 0 degrees, I emailed Jak and asked him as well.
J Frey a long time EDO guy suggests that for best take off performance we want the wing at the angle of attack for maximum lift while the floats are riding in the water at an angle for minimum drag. He stipulates that this angle is 14 degrees on most aircraft and that the angle where the floats have minimum drag is 8 degrees. Therefore 8 degrees (floats) plus 3 degrees (most aircraft angle of incidence) is 11 degrees, according to Frey in this example the floats should be set at 3 degrees. Having said that if the wing on the Highlander is at 0 degrees angle of incidence this all changes.
Then there is the EDO rule from the Clamar installation manual; Level the top of the float and angle the A/C in level flight angle up 2° for 300 HP and 8° for 85 HP. Therefore a 180 HP Supercub wing should have 3.5° to 4° angle up in flight. A Glastar/Sportsman 2+2 recommendation we’ve heard is 3.5° This seems excessive to me as we would be in the 7 deg range. Again in a previous post you stated that C-IBAD may be sitting tail low on floats, if the Clamar method is followed the aircraft will sit tail low.
I like the 1.5 to 3.5 degree figure that you recommended but I would like to know what our wing incidence is before I pinpoint a figure in that range.
Finally, the fore/aft position of the airframe on floats. Both Clamar and Peter Cowan have a simple method, determine the CG of the floats and center them on the empty CG of the aircraft. Do you recommend this? My aircraft CG is a little forward, would it be wise to set the floats a little aft to compensate?
Paul any information that you can provide with regard to rigging of floats on the Highlander will be greatly appreciated. Where you have time on type there may be particularities with the installation that only an experienced pilot can provide.
Thanks in advance,
Jack
http://www.stoneylake.org/pipcom/floatgeo.htm
http://www.stoneylake.org/pipcom/floatgeo.htm
Rigging Floats on the Highlander
-
Jack L
- Veteran Member
- Posts: 112
- Joined: Sun Apr 27, 2014 12:10 pm
Rigging Floats on the Highlander
You do not have the required permissions to view the files attached to this post.
-
danerazz
- Veteran Member
- Posts: 1240
- Joined: Tue Aug 18, 2009 9:33 pm
- Location: Bangor
Re: Rigging Floats on the Highlander
Just to be clear, the angle I was referring to is the angle between the horizontal stab and the spar carry-throughs in the fuselage. So if you want a 3.5 degree float to wing angle, then I would measure between these tubes as this is what everything else on the aircraft is based (tail, CG computations, etc.). I believe your computations on the float angle are based on an irrelevant number (angle of incidence). The 14 degree max lift number is a common figure, minus the 8 degree float min-drag, would leave you 6 degrees between the floats and wing. You shouldn't confuse the wing-tail incidence, or fuse-wing incidence angles. The best should be just hang the plane level at the spar tube carry through and, if using the first method you mentioned, align the floats 6 degrees nose-down from there.
I think the standard "3 degree" incidence is referring to the difference between level reference points and the wing on certified airplanes, the tail generally being level with this reference.
And also, I have never rigged floats or installed them, so I could be completely wrong (except for what the airplane is leveled by and the tail angle in reference to that).
Dane
Paralysis by analysis
#242
Paralysis by analysis
#242
-
Jack L
- Veteran Member
- Posts: 112
- Joined: Sun Apr 27, 2014 12:10 pm
Re: Rigging Floats on the Highlander
Dane,
I am out of my league here and trying to learn so bear with me, when I am referring to angle of incidence this is what I am referring to;
So that is the angle I wanted to know. Having said that if Paul agrees that 14 degrees works for the Highlander (it doesn't work for all aircraft) than I agree with you that the floats should be set 6 degrees below the spar carry through. If the Highlander wing chord is set 3 degrees above the longitudinal axis than the floats would be set three degrees below. I am looking for the best angle to avoid unnecessary drag.
One reason I was asking about the angle of incidence is if the upper door jamb on the Highlander represents the longitudinal axis and I know the angle that the wings are set at I can use a busted up fuselage like Bob Prins did (C-IBAD) to set the floats to the airframe.
Jack
You do not have the required permissions to view the files attached to this post.
-
danerazz
- Veteran Member
- Posts: 1240
- Joined: Tue Aug 18, 2009 9:33 pm
- Location: Bangor
Re: Rigging Floats on the Highlander
Notwithstanding washout, the standard highlander wing is 0 degrees to the fuselage/tail.
Dane
Paralysis by analysis
#242
Paralysis by analysis
#242
-
av8rps
- Veteran Member
- Posts: 480
- Joined: Thu May 12, 2011 5:01 pm
Re: Rigging Floats on the Highlander
Jack,
Somewhere else on the internet I covered most of this, but I can't recall where I put it So I'll shoot from the hip here;
For the width of the floats, I would recommend a 72 inch center to center dimension. That will allow you to trailer your Highlander with a legal trailering width, plus it will provide plenty of width for stability. AND, something most aren't aware of, floats that are close together perform better that floats that are spaced further apart, as the bow wave that comes off each float on the initial takeoff run helps to hydro-dynamically lift the other float up onto the step. My Highlander and my Kitfox both are spaced 72 inches center to center, and they both work well. And they are both very stable.
Height of floats; Your method sounds fine. I recall my Kitfox fuselage is 21 inches above top of float, and my Highlander is something like 23 inches.
Angle of floats: I personally like to have my floats set with a shallow angle so that the airplane will not fly off the water unless I rotate it. That allows me to step taxi at high speeds, which in my opinion is way more fun than having the wing generate all the lift it can at the slowest speed, forcing the airplane off the water at minimal flying speed. Plus, the shallow angle of the floats will allow you to keep most of your normal cruise speed. It's bad enough to pull those big floats around with wires and such creating all that excessive drag. But it's even worse when those floats are hanging bow down, creating even more drag, and then additionally forcing the wing to lift more than ever, causing the wing to fly with an increased angle of attack, adding even more drag (could there be a worse air-brake?) I once flew a Kitfox with an 8 degree angle and hated it. But the owner loved it because it flew off all by itself at 35 mph. So I guess it is a persons preference? To each his own I suppose?
But for me I like to have fun on the water with my seaplanes. And to do that a high angle doesn't work. That's why I like 3 to 3.5 degrees vs 7 or 8 degrees. I once owned an Avid Flyer that had virtually no positive angle on the floats. It was a real hotrod. I could step taxi it at 60 mph (which is a blast!), but if I wanted to demostrate a short water takeoff I could also rotate it hard at 25 mph and beat pretty much everything off the water. So with that said, I personally find a Highlander much like that old Avid. It has a lot of power and wing area for its weight. So unlike the antique, underpowered floatplanes of the past that needed much higher float angles to function, the Highlander doesn't need that, unless of course you want it that way.
Step location:; I try not to overly complicate how to do this as it seems there are countless opinions on how to do this, but not all are good information. The best thing to do in my opinion is to utlilize what someone else has already proven. So maybe ask the owner of C-IBAD if his airplane handled well on the step? Did it porpoise on takeoff? If so was it easy to stop? Would it ever porpoise when landing? What needed to be done to stop it? Did it handle well on the step when taxiing? If his answers indicate it worked well overall, and you know the owner is a competent seaplane pilot and would know the difference between a good and a bad install because he has flown other seaplanes, I would probably just copy where he rigged his floats fore and aft. Every float hull design can vary slightly with what works best for step placement, so if his Zenairs worked well for him with his step placement, I would just use his information for step placement.
But if you aren't comfortable with his answers, then you might be better off doing your own experimenting. I don't have the info I previously recommended in front of me right now, so I will give you my info basics off the top of my head. First level the fuselage (it is very important to get level - I use the bottom of door frame, which I recall is the same as the carry through spar tubes). Then hang a plumb bob from the area that would represent your most aft CG. Then locate the step 3 to 5 inches aft of where the plumb bob hangs. That should get you into the general range. And yes, there are many more scientifc formulas and ways to do for this, but this is what most of us have done with our experimentals. And for the most part it has always worked well. If it were easy to slide the float fore and aft, you may find a more exact measurement that might work better. Oh, and FWIW, I have never believed in prioritizing step location based on moving your CG aft. The actual location of the step for water performance (Hydrodynamics) is most important IMHO.
(continued)
Jack's Info needed:
Distance between floats;
Height above floats;
Angle between datum and floats; and
Fore/aft position of the airframe on the floats.
Somewhere else on the internet I covered most of this, but I can't recall where I put it
For the width of the floats, I would recommend a 72 inch center to center dimension. That will allow you to trailer your Highlander with a legal trailering width, plus it will provide plenty of width for stability. AND, something most aren't aware of, floats that are close together perform better that floats that are spaced further apart, as the bow wave that comes off each float on the initial takeoff run helps to hydro-dynamically lift the other float up onto the step. My Highlander and my Kitfox both are spaced 72 inches center to center, and they both work well. And they are both very stable.
Height of floats; Your method sounds fine. I recall my Kitfox fuselage is 21 inches above top of float, and my Highlander is something like 23 inches.
Angle of floats: I personally like to have my floats set with a shallow angle so that the airplane will not fly off the water unless I rotate it. That allows me to step taxi at high speeds, which in my opinion is way more fun than having the wing generate all the lift it can at the slowest speed, forcing the airplane off the water at minimal flying speed. Plus, the shallow angle of the floats will allow you to keep most of your normal cruise speed. It's bad enough to pull those big floats around with wires and such creating all that excessive drag. But it's even worse when those floats are hanging bow down, creating even more drag, and then additionally forcing the wing to lift more than ever, causing the wing to fly with an increased angle of attack, adding even more drag (could there be a worse air-brake?) I once flew a Kitfox with an 8 degree angle and hated it. But the owner loved it because it flew off all by itself at 35 mph. So I guess it is a persons preference? To each his own I suppose?
But for me I like to have fun on the water with my seaplanes. And to do that a high angle doesn't work. That's why I like 3 to 3.5 degrees vs 7 or 8 degrees. I once owned an Avid Flyer that had virtually no positive angle on the floats. It was a real hotrod. I could step taxi it at 60 mph (which is a blast!), but if I wanted to demostrate a short water takeoff I could also rotate it hard at 25 mph and beat pretty much everything off the water. So with that said, I personally find a Highlander much like that old Avid. It has a lot of power and wing area for its weight. So unlike the antique, underpowered floatplanes of the past that needed much higher float angles to function, the Highlander doesn't need that, unless of course you want it that way.
Step location:; I try not to overly complicate how to do this as it seems there are countless opinions on how to do this, but not all are good information. The best thing to do in my opinion is to utlilize what someone else has already proven. So maybe ask the owner of C-IBAD if his airplane handled well on the step? Did it porpoise on takeoff? If so was it easy to stop? Would it ever porpoise when landing? What needed to be done to stop it? Did it handle well on the step when taxiing? If his answers indicate it worked well overall, and you know the owner is a competent seaplane pilot and would know the difference between a good and a bad install because he has flown other seaplanes, I would probably just copy where he rigged his floats fore and aft. Every float hull design can vary slightly with what works best for step placement, so if his Zenairs worked well for him with his step placement, I would just use his information for step placement.
But if you aren't comfortable with his answers, then you might be better off doing your own experimenting. I don't have the info I previously recommended in front of me right now, so I will give you my info basics off the top of my head. First level the fuselage (it is very important to get level - I use the bottom of door frame, which I recall is the same as the carry through spar tubes). Then hang a plumb bob from the area that would represent your most aft CG. Then locate the step 3 to 5 inches aft of where the plumb bob hangs. That should get you into the general range. And yes, there are many more scientifc formulas and ways to do for this, but this is what most of us have done with our experimentals. And for the most part it has always worked well. If it were easy to slide the float fore and aft, you may find a more exact measurement that might work better. Oh, and FWIW, I have never believed in prioritizing step location based on moving your CG aft. The actual location of the step for water performance (Hydrodynamics) is most important IMHO.
(continued)
Jack's Info needed:
Distance between floats;
Height above floats;
Angle between datum and floats; and
Fore/aft position of the airframe on the floats.
Last edited by av8rps on Mon Feb 16, 2015 5:23 pm, edited 2 times in total.
-
av8rps
- Veteran Member
- Posts: 480
- Joined: Thu May 12, 2011 5:01 pm
Re: Rigging Floats on the Highlander
(continued from previous post)
Of course, it isn't easy to just slide floats back and forth on the airframe. So one hopes to get it right the 1st time. Thankfully the step location is not as critical as most think. So again, if C-IBAD has already found the location and it works, I'd use that. But if not, that's why they call these experimentals
Also, worth mentioning; It is always worth the time if you can make your rigging adjustable. For float angle it is good to make the struts adjustable, by either making extended fuselage to strut brackets that allow you to make additional holes up and down, and/or to make shims/spacers that fit under the lower strut to the float or spreader bar attachment. Unfortunately, making the fore and aft positions adjustable is much harder on the Zenairs, as the strut attachment locations are limited to the spreader bar spacing.
The cool thing about rigging a Highlander is that compared to most floatplanes it will be much more forgiving of rigging mistakes. The high horsepower per pound along with the low wing loading, and a super high lift wing make it a perfect candidate for becoming a floatplane. And being a side by side vs a tandem makes the CG range a lot more forgiving as well. So while the task of putting floats on it might seem a bit overwhelming, I think if you just follow logic you will end up with a good performing floatplane.
Hopefully all my jibberish here will help...
You do not have the required permissions to view the files attached to this post.
-
Jack L
- Veteran Member
- Posts: 112
- Joined: Sun Apr 27, 2014 12:10 pm
Re: Rigging Floats on the Highlander
Paul,
I really appreciate your help with this and I am sure that there are others that feel the same way. Harry told me that they are receiving numerous calls inquiring about floats and there is a SuperSTOL at the factory being built by an individual (maybe Bill Brown) that will be rigged for floats.
I actually flew Bob Prins' (C-IBAD) on floats with a flight instructor two years ago for over two hours but it was the first time flying floats and the first time flying a Highlander so my hands were full. To add to that we were flying in 20 knot winds in whitecaps and the instructor (my buddy) covered up all of the instruments, the best word I can use to describe flying this Highlander on floats was uneventful. There was no proposing or adverse effects that I recall. I remember Tony (the instructor) telling me to keep the stick back until the nose pitched up twice, on the second time I pushed the stick forward settling the aircraft on the step and once we were at flying speed I eased back on the stick and we were airborne.
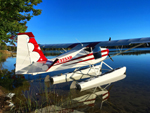
I have a pretty good feeling on 3 of the 4 criteria for rigging my aircraft but want to be sure of the "angle of floats". Bob is pretty sure that he set the floats 3 degrees below the wing chord or carry through at the spars. I bring this up again because looking at one of his pictures on the water you commented that the tail looked a little low. Here is a picture on the ground and from what I can tell it looks to be set at 3-4 degrees but if I was sure I wouldn't be asking you all of these questions. What do you think?
I spoke to Jak today about the angle of incidence and he told me that he remembered talking to Troy about this but he could not recall what the figure was. He had three figures in mind but could not be sure and suggested that I speak to Troy. I really don't want to set the floats too low increasing drag. Bob thinks that he cruises 85 mph at 5100 - 5200 RPM.
Jack
I really appreciate your help with this and I am sure that there are others that feel the same way. Harry told me that they are receiving numerous calls inquiring about floats and there is a SuperSTOL at the factory being built by an individual (maybe Bill Brown) that will be rigged for floats.
I actually flew Bob Prins' (C-IBAD) on floats with a flight instructor two years ago for over two hours but it was the first time flying floats and the first time flying a Highlander so my hands were full. To add to that we were flying in 20 knot winds in whitecaps and the instructor (my buddy) covered up all of the instruments, the best word I can use to describe flying this Highlander on floats was uneventful. There was no proposing or adverse effects that I recall. I remember Tony (the instructor) telling me to keep the stick back until the nose pitched up twice, on the second time I pushed the stick forward settling the aircraft on the step and once we were at flying speed I eased back on the stick and we were airborne.
I have a pretty good feeling on 3 of the 4 criteria for rigging my aircraft but want to be sure of the "angle of floats". Bob is pretty sure that he set the floats 3 degrees below the wing chord or carry through at the spars. I bring this up again because looking at one of his pictures on the water you commented that the tail looked a little low. Here is a picture on the ground and from what I can tell it looks to be set at 3-4 degrees but if I was sure I wouldn't be asking you all of these questions. What do you think?
I spoke to Jak today about the angle of incidence and he told me that he remembered talking to Troy about this but he could not recall what the figure was. He had three figures in mind but could not be sure and suggested that I speak to Troy. I really don't want to set the floats too low increasing drag. Bob thinks that he cruises 85 mph at 5100 - 5200 RPM.
Jack
You do not have the required permissions to view the files attached to this post.
-
gkremers
- Veteran Member
- Posts: 495
- Joined: Sun Aug 08, 2010 8:06 am
- Location: Michigan
Re: Rigging Floats on the Highlander
Really great info guys. I am so close to ordering some anphibious floats I can taste it.
Gary
Gary
-
av8rps
- Veteran Member
- Posts: 480
- Joined: Thu May 12, 2011 5:01 pm
Re: Rigging Floats on the Highlander
Jack,
I'm happy to help any way I can. The more floatplanes the merrier is the way I see it
It sounds to me like C-IBAD is set up pretty good. All of what you described are good characteristics, so if it were me I'd just copy his rigging. Especially considering that you both have the same float design. I looked at the picture to see his throat angle (incidence of floats vs level area on fuselage), and have to say that it looks like it is more than 3 degrees. But then again, I typically use the door frame bottom as that is what we have always used on this type of an airplane (kitfox, Avid, Highlander, etc). I wish I had my Kitfox numbers in front of me right now to provide that to you, but I don't. I seem to recall that to the door frame bottom it is only 1.5 degrees. But don't quote me on that. I attached a picture so you can see for yourself how the float looks in relation to the fuselage.
So if you do copy his rigging I would somehow or other make the strut length adjustable so you could take some of that throat angle out. An easy way to do that would be to just make the fuselage attach brackets longer so you can move the strut up or down by just moving the rear strut up or down to get whatever angle you desire, and then drill new holes in the bracket to hold it in place. You could also put plates under the bottom of the strut attach brackets where they hook to your spreader bar. If C-IBAD is truly set at 3 degrees, I would try about half of that number, or maybe at 2 degrees. But again that's just me. As good as it appears to work, you might just want to copy his entire setup. 85 mph cruise on big floats at those lower rpm settings is a pretty good number in my opinion, as those are pretty big floats, so I wouldn't be surprised if you lose 10 mph in cruise speed. Losing cruise is never good, but with floats it is all worth it
Paul
ps - if you care to see more of my jibberish regarding float installation, here is a lionk to something I shared with the Kitfox crowd a while ago http://www.teamkitfox.com/Forums/showth ... 042&page=3
That link also shows my drawings for extended strut fittings
You do not have the required permissions to view the files attached to this post.
-
Jack L
- Veteran Member
- Posts: 112
- Joined: Sun Apr 27, 2014 12:10 pm
Re: Rigging Floats on the Highlander
Hey Paul,
Thanks again for your guidance and advice.
I just spent the day with Bob and he gave me his notes from his float installation. His floats were set 24 inches below the bottom longeron and 3 degrees tail down. The floats CG are 5" ahead of the step and he located that point 12" aft of datum, the recommendation was to go further aft but he decided to go with 12".
Seeing the stance of your Kitfox I will definitely cut the throat angle back a little, I don't mind having to use my hands and feet to rotate the aircraft and I do not want to induce drag with the tips of the floats hanging too low. Bob may of set the floats CG a little forward as you and others suggest setting the step 3-5" aft of the aircraft aft CG limit and Peter Cowan suggests to set the float CG at the aircrafts aft CG limit. My aircraft empty CG is 9.40 which is more fwd than optimum so I will go with your advice and move the floats aft.
Jack
-
Jack L
- Veteran Member
- Posts: 112
- Joined: Sun Apr 27, 2014 12:10 pm
Re: Rigging Floats on the Highlander
Paul,
Now that I have an idea where to start with the spreader bar and strut rigging could you share some ideas on bringing the water rudder cable into the fuselage and what type of mechanism is best suited to raise and lower the water rudders?
I have seen bent tubes that act as guides at the bottom of the fuselage and I have also seen a hole made with a soldering iron to route the cable through the fuselage. I have electric trim on my aircraft so would the manual trim location work well for a water rudder lever?
Can you also share your thoughts on a spreader bar to lift the aircraft. I am sure you have seen all kinds but what works best for you? Would AN45 I bolts with shackles be good to use on the forward spar attach points?
That Kitfox is a sweet looking aircraft... very nice.
Jack
-
pt17
- Forum Regular
- Posts: 28
- Joined: Tue Jan 04, 2011 6:09 pm
- Location: Melbourne Australia
Re: Rigging Floats on the Highlander
I went with the rigging instructions ( regarding dimensions, angles float position etc) on diagram FL-112 that came with the Zenair float kit. All complete, but not yet tested.

-
Jack L
- Veteran Member
- Posts: 112
- Joined: Sun Apr 27, 2014 12:10 pm
Re: Rigging Floats on the Highlander
What? FL 112?pt17 wrote:I went with the rigging instructions ( regarding dimensions, angles float position etc) on diagram FL-112 that came with the Zenair float kit. All complete, but not yet tested.
Three of us ordered our float kits at the same time and two of us did not receive FL 112, the third person is away from home and will not be able to check until the end of the month. Do the figures on FL 112 come close to what we discuss in this post?
I will call Zenair today.
Thanks,
Jack
-
danerazz
- Veteran Member
- Posts: 1240
- Joined: Tue Aug 18, 2009 9:33 pm
- Location: Bangor
Re: Rigging Floats on the Highlander
Not that I have any vast amount of float experience, but the little I do have was a certified airplane and the water rudder control was simply a cable with a knob on the end and a bracket with a slot that you pulled the knob and "hooked" it in the slot to hold the rudders up. It has been a couple of years, but I think there was a fair amount of travel required to bring the rudders up. A lever may require some creative geometry to have enough throw, but it could have a pretty simple over-center setup to "lock" them in the up position.Jack L wrote:Paul,
Now that I have an idea where to start with the spreader bar and strut rigging could you share some ideas on bringing the water rudder cable into the fuselage and what type of mechanism is best suited to raise and lower the water rudders?
I have seen bent tubes that act as guides at the bottom of the fuselage and I have also seen a hole made with a soldering iron to route the cable through the fuselage. I have electric trim on my aircraft so would the manual trim location work well for a water rudder lever?
Can you also share your thoughts on a spreader bar to lift the aircraft. I am sure you have seen all kinds but what works best for you? Would AN45 I bolts with shackles be good to use on the forward spar attach points?
That Kitfox is a sweet looking aircraft... very nice.
Jack
Dane
Paralysis by analysis
#242
Paralysis by analysis
#242
-
Jack L
- Veteran Member
- Posts: 112
- Joined: Sun Apr 27, 2014 12:10 pm
Re: Rigging Floats on the Highlander
Thanks Dane,
That is how C-IBAD is rigged and you are right, it does take a lot of travel to move the ruddere. If That is the best way to go that is what I will do.
Jack
That is how C-IBAD is rigged and you are right, it does take a lot of travel to move the ruddere. If That is the best way to go that is what I will do.
Jack