

I've just ordered a Highlander. I've also just about finished building my 40*70 barn. So I will be getting it fitted up over the next 3 months. Right now, its just the tractor and a few other pieces of machinery.
Any recommendations on set up/staging/stands/layout/equipment/specialty tools would be much appreciated. Not sure its needed but I do have access to 3 phase. I have toy MIG welder and an arc welder, as well as all the typical tools.
Thanks.
Ed
Workshop
-
EchoWhiskey
- Seasoned Member
- Posts: 63
- Joined: Tue Sep 18, 2018 9:15 pm
Workshop
Ed Whitaker
Humble Novice
What do you get when things don't go as planned? Experience.
Humble Novice
What do you get when things don't go as planned? Experience.
-
SheepdogRD

- Proprietor
- Posts: 933
- Joined: Tue Nov 30, 2010 5:41 pm
- Location: West of Atlanta, GA
Re: Workshop
I built rotisseries for the wings and fuselage from wood, but, if I do it again, I'll weld up some like the steel units they build for use at the factory.
Factory style for the fuselage: Factory style for wings: Only one of each rotisserie pair has the rotation lock.
Our rotisseries have casters, but the factory's don't; when they want to move something -- such as to painting -- they lift the rotisseries onto platforms with casters.
Some builders make rotisseries from relatively inexpensive engine stands.
When I got my box from Aircraft Spruce, I put pegboard on the wall, and hung all the little baggies on it. Next time, I'll make a roll-around parts cabinet that I can take to the area I'm working in, rather than trudging off to the wall to get parts. I think I'd prefer a cabinet with drawers, but here's an open one I like:
And that reminds me: ask the factory if they'll order your box of Aircraft Spruce parts early, and have it drop-shipped direct to you before your kit ships. Then you can do your inventory and decide how to organize and store them well before the rest of the parts get there. If that box arrives with your kit, you have to do the inventory and organization instead of starting the build.
You do not have the required permissions to view the files attached to this post.
Richard Holtz
Highlander N570L -- Ms. Tonka -- in gestation
If just enough is really good, then too much ought to be perfect.
Highlander N570L -- Ms. Tonka -- in gestation
If just enough is really good, then too much ought to be perfect.
-
Tralika

- Veteran Member
- Posts: 386
- Joined: Thu Oct 08, 2009 12:49 pm
- Location: Wasilla Alaska
Re: Workshop
All good suggestions from Richard. I would also suggest that you have adequate shelving and storage for good organization and easy access to all the parts. If you have to stack your parts it's going to cost you a LOT of time when your building. I had everything pretty well organized but I didn't have a lot of space. I don't know how much time I spent looking for parts but it was a lot. It will save time if you organize your parts in groups related to the assemblies, like wings, flaps, ailerons, fuselage, landing gear, etc What really feels good is when you get near the end of the build and there's no more parts on the shelves, everything is on the plane.
The rotisserie is a very handy tool, I had one for the fuselage but if you want to use it for your wings you'll need two sets (when you work on the wings you'll work on them side by side and do everything to both at the same time). I used PVC pipe and saw horses and it worked fine. The PVC pipe fit into the rotisserie as well but the only time I used that was when I was painting. Also, early in the build the manual will instruct you to fit and install the vertical stabilizer. I fit but did not permanently install the vertical stab at that point because once you do, you will not be able to rotate the fuselage upside down with the rotisserie. I did not finish the permanent installation of the vert stab until after I covered the bottom of the fuselage with fabric. It made it really easy to fit the bottom fabric with the fuselage upside down.
The rotisserie is a very handy tool, I had one for the fuselage but if you want to use it for your wings you'll need two sets (when you work on the wings you'll work on them side by side and do everything to both at the same time). I used PVC pipe and saw horses and it worked fine. The PVC pipe fit into the rotisserie as well but the only time I used that was when I was painting. Also, early in the build the manual will instruct you to fit and install the vertical stabilizer. I fit but did not permanently install the vertical stab at that point because once you do, you will not be able to rotate the fuselage upside down with the rotisserie. I did not finish the permanent installation of the vert stab until after I covered the bottom of the fuselage with fabric. It made it really easy to fit the bottom fabric with the fuselage upside down.
You do not have the required permissions to view the files attached to this post.
John Nealon
Wasilla, Alaska
Highlander Extreme #191
mykitlog.com/jnealon
Wasilla, Alaska
Highlander Extreme #191
mykitlog.com/jnealon
-
SheepdogRD
- Proprietor
- Posts: 933
- Joined: Tue Nov 30, 2010 5:41 pm
- Location: West of Atlanta, GA
Re: Workshop
Just by coincidence, a smaller (52-bin) version of that open-bin rack I referenced above turned up in my email today, on sale for $99.99 at Northern Tool. https://www.northerntool.com/shop/tools ... _200659365
The smaller one is 33-1/2" high. The larger (88-bin) version is 48-3/4" high, and costs $90 more on sale. Reviews say the plastic trays aren't heavy duty, but I'd bet they're fine for aircraft building.
The important feature for me is the portability; almost everything in our shop is on casters. I think I'd add some pegboard on the ends for the tiny parts and rarely-used stuff that would be best left in the baggies.
You do not have the required permissions to view the files attached to this post.
Richard Holtz
Highlander N570L -- Ms. Tonka -- in gestation
If just enough is really good, then too much ought to be perfect.
Highlander N570L -- Ms. Tonka -- in gestation
If just enough is really good, then too much ought to be perfect.
-
SheepdogRD
- Proprietor
- Posts: 933
- Joined: Tue Nov 30, 2010 5:41 pm
- Location: West of Atlanta, GA
Re: Workshop
One good use of your time is to go back and read through the forum while you wait for your kit to arrive. It's a terrific resource.
There have been several threads on the forum relating to tool choices. Here are some I've found useful:
http://www.wingsforum.com/viewtopic.php ... 60&p=47450
http://www.wingsforum.com/viewtopic.php ... 26&p=46197
http://www.wingsforum.com/viewtopic.php ... 90&p=43410
http://www.wingsforum.com/viewtopic.php ... 74&p=39299
http://www.wingsforum.com/viewtopic.php ... 40&p=32897
http://www.wingsforum.com/viewtopic.php ... 32&p=26048
http://www.wingsforum.com/viewtopic.php ... 96&p=26046
Richard Holtz
Highlander N570L -- Ms. Tonka -- in gestation
If just enough is really good, then too much ought to be perfect.
Highlander N570L -- Ms. Tonka -- in gestation
If just enough is really good, then too much ought to be perfect.
-
Tralika
- Veteran Member
- Posts: 386
- Joined: Thu Oct 08, 2009 12:49 pm
- Location: Wasilla Alaska
Re: Workshop
John Nealon
Wasilla, Alaska
Highlander Extreme #191
mykitlog.com/jnealon
Wasilla, Alaska
Highlander Extreme #191
mykitlog.com/jnealon
-
SuperFly
- Veteran Member
- Posts: 249
- Joined: Wed Jun 08, 2011 10:20 pm
- Location: Flanagan, IL
- Contact:
Re: Workshop
Hi Ed,
Every builder will have some recommendations after the build, and they each likely will be a slightly different list. Thats not a bad thing. Everyone sees value in different things, and everyone does things just a touch different. As far as the welders, a shop should always have a welder, but you shouldn't need it on your build. All the welding is done. However, I modified/made a couple of tools during my build that required a welder, and am glad I have a couple available.
As far as setting up the shop, I consider these requirements...
Lighting. (Lots of it. Put in too much, then add some more)
Radio. (or some form of music, otherwise if someone strolls in while your working, they'll hear only your shower concert voice)
Muffin Tins. (The silicone ones are fantastic, although I used the metal ones prior. Use to sort all the nuts, bolts, washers, etc needed for a particular portion of the build that you will be working on, rather than getting one at a time from long term stock drawers or shelves)
Plastic rolling cart. (depending on the size of your shop, it is nice to have to pull along side you as a small work station/bench for tools, and of course muffin trays)(I also wrapped the upper edges with foam pipe insulation later in the project to protect against an rouge cart bumping a painted airplane)
Air Compressor. (size will depend on a couple factors. I am fortunate enough to have another building to house the air compressor, and buried a line under ground to serve shop, so you can still hear the above mentioned radio)
TV. (I would periodically play DVDs of back country flying while in the shop. Great motivation to keep building)
Refridgerator. (many friends will stop by to "help" which is code for drink your beer while standing in the way)
Drill Bits. (Especially #30 or 1/8". Buy good ones, buy many. Also buy different lengths. 6" & 12" come in VERY handy)
Right angle drill attachment. (Cleveland Aircraft Tool, Aircraft Spruce, Wicks, etc. Get one, and several different bits, again #30 or 1/8" most used)
1/4" battery powered ratchet. (I have the milwaukee version, LOVE it! Its small enough to fit many places, and it doesnt get things very tight if you baby it, then torque manually afterwards)
Clecos. (Mostly #30, but Id buy 10 of the #40, and 10 3/16 too)
Cleco Pliers. (above pretty useless with out. )
)
I LOVE my Souix plam air drill. (not a necessity, as you can do fine with a small battery drill, but once you've used a air palm drill, pretty hard to go back)
I could go on for days, but most of my friends say I have a tool problem. I prefer to call it a fetish.
Best of Luck!
Every builder will have some recommendations after the build, and they each likely will be a slightly different list. Thats not a bad thing. Everyone sees value in different things, and everyone does things just a touch different. As far as the welders, a shop should always have a welder, but you shouldn't need it on your build. All the welding is done. However, I modified/made a couple of tools during my build that required a welder, and am glad I have a couple available.
As far as setting up the shop, I consider these requirements...
Lighting. (Lots of it. Put in too much, then add some more)
Radio. (or some form of music, otherwise if someone strolls in while your working, they'll hear only your shower concert voice)
Muffin Tins. (The silicone ones are fantastic, although I used the metal ones prior. Use to sort all the nuts, bolts, washers, etc needed for a particular portion of the build that you will be working on, rather than getting one at a time from long term stock drawers or shelves)
Plastic rolling cart. (depending on the size of your shop, it is nice to have to pull along side you as a small work station/bench for tools, and of course muffin trays)(I also wrapped the upper edges with foam pipe insulation later in the project to protect against an rouge cart bumping a painted airplane)
Air Compressor. (size will depend on a couple factors. I am fortunate enough to have another building to house the air compressor, and buried a line under ground to serve shop, so you can still hear the above mentioned radio)
TV. (I would periodically play DVDs of back country flying while in the shop. Great motivation to keep building)
Refridgerator. (many friends will stop by to "help" which is code for drink your beer while standing in the way)
Drill Bits. (Especially #30 or 1/8". Buy good ones, buy many. Also buy different lengths. 6" & 12" come in VERY handy)
Right angle drill attachment. (Cleveland Aircraft Tool, Aircraft Spruce, Wicks, etc. Get one, and several different bits, again #30 or 1/8" most used)
1/4" battery powered ratchet. (I have the milwaukee version, LOVE it! Its small enough to fit many places, and it doesnt get things very tight if you baby it, then torque manually afterwards)
Clecos. (Mostly #30, but Id buy 10 of the #40, and 10 3/16 too)
Cleco Pliers. (above pretty useless with out.
I LOVE my Souix plam air drill. (not a necessity, as you can do fine with a small battery drill, but once you've used a air palm drill, pretty hard to go back)
I could go on for days, but most of my friends say I have a tool problem. I prefer to call it a fetish.
Best of Luck!
Best,
Ben Schneider
Highlander #263 converted to SuperSTOL
N45FT Now Flying!
http://www.stolairplane.com
Ben Schneider
Highlander #263 converted to SuperSTOL
N45FT Now Flying!
http://www.stolairplane.com
-
AV8R Paul
- Veteran Member
- Posts: 578
- Joined: Sun Mar 22, 2015 7:49 pm
- Location: Garland, Texas
Re: Workshop
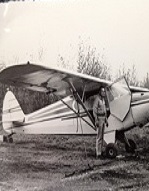
I saw this and it would be extremely helpful in building an airplane. I would put some side wheel stops as well.
You do not have the required permissions to view the files attached to this post.
AV8R Paul
Certified Light Sport Repairman LSRM-A
Certified Light Sport Repairman LSRM-A
-
SheepdogRD
- Proprietor
- Posts: 933
- Joined: Tue Nov 30, 2010 5:41 pm
- Location: West of Atlanta, GA
Re: Workshop
I didn't have the chair base idea 'til late in the build when the tail was already pretty heavy. It would take quite a hit to skid that 10" tailwheel off there with the wings on and folded, so I never added the side rails.AV8R Paul wrote:I saw this and it would be extremely helpful in building an airplane. I would put some side wheel stops as well.
But early in the build, when the bare fuselage is light, I think side rails would be a good precaution.
Richard Holtz
Highlander N570L -- Ms. Tonka -- in gestation
If just enough is really good, then too much ought to be perfect.
Highlander N570L -- Ms. Tonka -- in gestation
If just enough is really good, then too much ought to be perfect.
-
Tralika
- Veteran Member
- Posts: 386
- Joined: Thu Oct 08, 2009 12:49 pm
- Location: Wasilla Alaska
Re: Workshop
I'd be leery about using an office chair base for a tailwheel jack. There are so many cheap Chinese products out there that you have no way of knowing the weight capacity of the base and those plastic casters. I think this Transmission Jack from HF would be an ideal tailwheel jack but of course it costs $100 ($80 with the coupon).
https://www.harborfreight.com/450-lb-ca ... 39178.html
The hydraulic table lifts would work well too and have other uses that would make it come in handy, like loading/unloading something heavy in a pick up truck by yourself. Of course the table lift is even more expensive and you need space to store it as well.
https://www.harborfreight.com/500-lbs-c ... 60730.html
Since I live in Alaska neither is a realistic option for since me shipping costs make this sort of thing cost prohibitive.
John Nealon
Wasilla, Alaska
Highlander Extreme #191
mykitlog.com/jnealon
Wasilla, Alaska
Highlander Extreme #191
mykitlog.com/jnealon
-
AV8R Paul
- Veteran Member
- Posts: 578
- Joined: Sun Mar 22, 2015 7:49 pm
- Location: Garland, Texas
Re: Workshop
For $99 it wouldn't be worth building a tail roll around, unless you had a chair sitting around.
https://www.harborfreight.com/450-lb-ca ... 39178.html
https://www.harborfreight.com/450-lb-ca ... 39178.html
AV8R Paul
Certified Light Sport Repairman LSRM-A
Certified Light Sport Repairman LSRM-A
-
BDA
- Veteran Member
- Posts: 707
- Joined: Mon Aug 22, 2016 11:25 am
- Location: Kenai Alaska
Re: Workshop
I bought extra long drill bits from harbor freight - like 24” - came in really handy
I organized my parts by assembly thinking it would save time - nope - many common parts spent alot of time looking
2 or 3 small screw gun/ drill so u dont have to keep switching back and forth
Dont skimp on reamers - just order a set
Bur away tool - and several new blades
Order oversize rivets and an extra bolt assortment
Shop vac
Level floor
I have 3 -8’ tables plus a 20’ shop bench
Its all full
Something to watch youtube how to - on
SuperStol XL Alaskan With Titan 340
N331AK. Shawn Taplin
Wing extensions,Symetrical Airfoil tail ribs (NACA 21)
Mods in progress: Heavier struts, Double slotted flaps
Goal: 15mph no wind
N331AK. Shawn Taplin
Wing extensions,Symetrical Airfoil tail ribs (NACA 21)
Mods in progress: Heavier struts, Double slotted flaps
Goal: 15mph no wind