

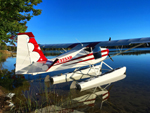
Got the floats off just before Thanksgiving. Looking forward to the colder temps and snow.
Gary
Changing seasons
-
gkremers
- Veteran Member
- Posts: 495
- Joined: Sun Aug 08, 2010 8:06 am
- Location: Michigan
Changing seasons
You do not have the required permissions to view the files attached to this post.
-
rpigeek
- New Member
- Posts: 15
- Joined: Wed Oct 10, 2018 12:10 pm
Re: Changing seasons
How long did it take to switch? Do you keep the tail wheel on with the floats?
-
Jack L
- Veteran Member
- Posts: 112
- Joined: Sun Apr 27, 2014 12:10 pm
Re: Changing seasons
Gary, could we see a picture and some details regarding your crane?
I have been flying a Rans S7S on floats while restoring my J3. Last fall I had to remove the floats from my J3 and although the tractor with forks I used to lift the aircraft was successful I am interested in a more stable and permanent solution.
Jack
I have been flying a Rans S7S on floats while restoring my J3. Last fall I had to remove the floats from my J3 and although the tractor with forks I used to lift the aircraft was successful I am interested in a more stable and permanent solution.
Jack
-
gkremers
- Veteran Member
- Posts: 495
- Joined: Sun Aug 08, 2010 8:06 am
- Location: Michigan
Re: Changing seasons
The change from floats to wheels doesn't take very long. Approx. 3hours
1. Install the tail wheel (i use a pneumatic table positioned under the tail wheel)
2. Remove the seats
3. Disconnect the electric connections at a junction block (the floats have 4 electric motors)
4. Disconnect the brake lines (the brake connections are under the seats)
5. Remove the upper and lower cowl.
6. Disconnect the float wires for the rudder and rudder up/down.
After that is done is just a matter of slightly lifting the plane on the hoist and tailwheel.
1. Remove the foreword and aft spreader wires.
2. Remove the 4 bolts that attach the struts to the fuselage
The wheels and landing gear go on really fast. Just need to install the V-Brace and attach the gear to the fuselage attach points and V-Brace. Reconnect the bake lines, bleed brakes and reinstall the seats and cowls.
The tailwheel does not stay on when the floats are on.
The lift is made by Aero Lift. I keep the RV10 up on the lift, it gives me more working space in the hangar. I just configure it for lifting the Highlander from the motor mount.
Gary
You do not have the required permissions to view the files attached to this post.