

Hey Guys,
Seems there's a little bit to these doors...
First , the upper part of the door frame , is not on the prints.
In order to get this "right".... I needed to push the plane out , and set up the wings....
This was the only way to get it exact.... I had some "guess" lines that were close....
But I didn't want the tube too low or too high...
I will post a measurement from the bottom of the fuselage , to show where the tubes belong...
Then... They can be installed from the beginning , when the fuselage sides are built...
.
.
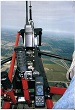
Here's the plane outside , getting the exact position for the tube...
.
.
Gotta Fly...
.
.
.
(19) Doors ( Mike )
-
planecrazzzy
- Site Admin
- Posts: 1154
- Joined: Sat Jan 01, 2005 1:23 pm
- Location: Minnesota
- Contact:
(19) Doors ( Mike )
You do not have the required permissions to view the files attached to this post.
Sometimes you just have to take the leap
and build your wings on the way down...
Gotta Fly...
and build your wings on the way down...
Gotta Fly...
-
planecrazzzy
- Site Admin
- Posts: 1154
- Joined: Sat Jan 01, 2005 1:23 pm
- Location: Minnesota
- Contact:
Re: Doors ( Mike )
OK,
Door frame tube is in place...
The Hinges are a Grey area.... and I really don't like the upper door hinge...
Looking at Earl's building pictures , I don't think he has the doors sealed very good....
I'm changing my hinges.... ( I'm changing the whole door )
Also , I will be "Skinning" my door with 6061 T6 Aluminum... , which will overlap the frame...
and should get a tight seal around the door....
The Tailwind door is made in the door frame , with 1/8" shims all around it....
I did this at first.... But later found I needed to raise the lower tube , to weld a "weldnut" at the bottom door hinge....
After I made both doors... I installed "one"..... I needed to push the plane outside AGAIN...
in order to see if the door would "clear" the bottom of the wing.....
I have 1-1/2" dihedral in my wings.... But the door "rises" when opened....
I put it together and checked it.... it works , Barely.....
Here's some pictures...
.
.
Gotta Fly...
.
.
.
You do not have the required permissions to view the files attached to this post.
Sometimes you just have to take the leap
and build your wings on the way down...
Gotta Fly...
and build your wings on the way down...
Gotta Fly...
-
planecrazzzy
- Site Admin
- Posts: 1154
- Joined: Sat Jan 01, 2005 1:23 pm
- Location: Minnesota
- Contact:
Re: Doors ( Mike )
mo pix
You do not have the required permissions to view the files attached to this post.
Sometimes you just have to take the leap
and build your wings on the way down...
Gotta Fly...
and build your wings on the way down...
Gotta Fly...
-
planecrazzzy
- Site Admin
- Posts: 1154
- Joined: Sat Jan 01, 2005 1:23 pm
- Location: Minnesota
- Contact:
Re: Doors ( Mike )
The Bottom "Hinge Bolt" , doesn't have a way to keep it from coming out....
I welded some little scrap pieces , with holes drilled into them...
I will be able to put a loose safety wire on the head of the bolts....
The top of the door will get a nylock nut....
.
.
Gotta Fly...
.
.
I welded some little scrap pieces , with holes drilled into them...
I will be able to put a loose safety wire on the head of the bolts....
The top of the door will get a nylock nut....
.
.
Gotta Fly...
.
.
You do not have the required permissions to view the files attached to this post.
Sometimes you just have to take the leap
and build your wings on the way down...
Gotta Fly...
and build your wings on the way down...
Gotta Fly...
-
planecrazzzy
- Site Admin
- Posts: 1154
- Joined: Sat Jan 01, 2005 1:23 pm
- Location: Minnesota
- Contact:
Re: Doors ( Mike )
Hey Guys,
Next step was to put "door stops" in place....
After those were in place , I was ready to make the door handles and a door latch...
I have a very simple and light system....
There's a key lock on the pilot side...
and a self locking mechanism on the passenger side.
This was mostly made out of Stainless Steel
Here's some Pix
..
Gotta Fly...
.
.
You do not have the required permissions to view the files attached to this post.
Sometimes you just have to take the leap
and build your wings on the way down...
Gotta Fly...
and build your wings on the way down...
Gotta Fly...
-
planecrazzzy
- Site Admin
- Posts: 1154
- Joined: Sat Jan 01, 2005 1:23 pm
- Location: Minnesota
- Contact:
Re: Doors ( Mike )
mo pix
You do not have the required permissions to view the files attached to this post.
Sometimes you just have to take the leap
and build your wings on the way down...
Gotta Fly...
and build your wings on the way down...
Gotta Fly...
-
planecrazzzy
- Site Admin
- Posts: 1154
- Joined: Sat Jan 01, 2005 1:23 pm
- Location: Minnesota
- Contact:
Re: Doors ( Mike )
This is my "Auto" lock on the passenger side....
I was going to put "just" an inside door handle.... But I thought that would give me problems later...
If I need to work on the passenger side.... I'd need to go around to open the door...
This system will auto-lock the door....
But a toothpick can also be used to hold it and keep it from locking....
or the screw will come out.... and it can be removed...
.
.
Gotta Fly...
.
.
You do not have the required permissions to view the files attached to this post.
Sometimes you just have to take the leap
and build your wings on the way down...
Gotta Fly...
and build your wings on the way down...
Gotta Fly...
-
planecrazzzy
- Site Admin
- Posts: 1154
- Joined: Sat Jan 01, 2005 1:23 pm
- Location: Minnesota
- Contact:
Re: Doors ( Mike )
In these photo's , you can see the door "stops".... Three type...
The top one , just "flat stock" with some holes... it can be "tapped" with a hammer for fine tuning....
The bottom one has a screw that can be adjusted... ( once the door skin is on )
The third "stop" , is a MIG welded bead .... coated with Silicone Bronze....
This one keeps the door from sagging , which will help a tight fit on the door skin to front/side panel match up ...
.
.
Gotta Fly...
.
.
You do not have the required permissions to view the files attached to this post.
Sometimes you just have to take the leap
and build your wings on the way down...
Gotta Fly...
and build your wings on the way down...
Gotta Fly...
-
planecrazzzy
- Site Admin
- Posts: 1154
- Joined: Sat Jan 01, 2005 1:23 pm
- Location: Minnesota
- Contact:
Re: Doors ( Mike )
Hey Guys,
I'm also modifying the door skins... I'm doing it more like most Tailwinds ... Aluminum...
I used .032 6061 T6 , because it's what I had..... Thinner would be better...
Also , to save on Aluminum , I'm making "sections".... The lower door skin is one piece.
The upper frame around the window , is made from three pieces...
I welded the upper three pieces , but it'll stay separate from the lower skin....
.
Gotta Fly...
.
.
You do not have the required permissions to view the files attached to this post.
Sometimes you just have to take the leap
and build your wings on the way down...
Gotta Fly...
and build your wings on the way down...
Gotta Fly...
-
planecrazzzy
- Site Admin
- Posts: 1154
- Joined: Sat Jan 01, 2005 1:23 pm
- Location: Minnesota
- Contact:
Re: Doors ( Mike )
Next, I fit the lower skin and added cleco's to keep it in place...
Then I fit the two vertical pieces for the frame , getting a good match up to the lower skin...
After , I fit the top frame pieces , I put some cleco's in them to hold during welding....
After I welded to top pieces together , I ground them flush and ran them through the English Wheel
also , I needed a little extra work with the English Wheel to help alien the rivets again....
.
Just a note , I made my frame pieces a little big.... After welding , they were sheared to size...
.
. Gotta Fly...
.
.
You do not have the required permissions to view the files attached to this post.
Sometimes you just have to take the leap
and build your wings on the way down...
Gotta Fly...
and build your wings on the way down...
Gotta Fly...
-
planecrazzzy
- Site Admin
- Posts: 1154
- Joined: Sat Jan 01, 2005 1:23 pm
- Location: Minnesota
- Contact:
Re: Doors ( Mike )
After the upper window frame was welded , cleaned up , and trimmed....
The lay-out for the radius was done.... The side window pieces were cut wide to accommodate this....
The radius was done with a spray paint "Cap".... I looked at a 2 inch radius , but it was small....
The cap was about 2-1/2" or more....
.
.
Gotta Fly...
The lay-out for the radius was done.... The side window pieces were cut wide to accommodate this....
The radius was done with a spray paint "Cap".... I looked at a 2 inch radius , but it was small....
The cap was about 2-1/2" or more....
.
.
Gotta Fly...
You do not have the required permissions to view the files attached to this post.
Sometimes you just have to take the leap
and build your wings on the way down...
Gotta Fly...
and build your wings on the way down...
Gotta Fly...
-
planecrazzzy
- Site Admin
- Posts: 1154
- Joined: Sat Jan 01, 2005 1:23 pm
- Location: Minnesota
- Contact:
Re: Doors ( Mike )
Since I modified my doors , they open different....
In fact , the front of the door moves "inside" .....
So I used my "Beader" , and formed a lip on the edge of the door skin....
The forward fuselage skin will over lap this for a good seal... ( see example )
.
.
Gotta Fly...
.
.
.
In fact , the front of the door moves "inside" .....
So I used my "Beader" , and formed a lip on the edge of the door skin....
The forward fuselage skin will over lap this for a good seal... ( see example )
.
.
Gotta Fly...
.
.
.
You do not have the required permissions to view the files attached to this post.
Sometimes you just have to take the leap
and build your wings on the way down...
Gotta Fly...
and build your wings on the way down...
Gotta Fly...
-
planecrazzzy
- Site Admin
- Posts: 1154
- Joined: Sat Jan 01, 2005 1:23 pm
- Location: Minnesota
- Contact:
Re: Doors ( Mike )
This is a good time to show a little tool I made to help find "center" of the tube for drilling....
If the hole in the tube isn't exactly center , it's gonna warp the skin.....
For the 1/2 inch tube , I was measuring the skin "To the Tube"... then adding 1/4 inch...
"Close" , but not close enough , this jig helps "Nail it"
.
I thought I was making this for drilling 1/2" , 5/8" and 3/4" tubes
Oooops , I goofed .... it fits 1/2" , 3/4" and 1" ( Oh well...)
I tried the jig , it works great.... Just watch the angle , it needs to be in line with the skin....
.
To get an accurate spacing before welding it , I put an 1/8" bit in the hole , and used a 3/16" bit for a spacer...
I clamped it using two thickness's of skin ( 1/16" total )... Welded it and let cool before taking the clamp off....
.
.
Gotta Fly...
.
.
You do not have the required permissions to view the files attached to this post.
Sometimes you just have to take the leap
and build your wings on the way down...
Gotta Fly...
and build your wings on the way down...
Gotta Fly...