Where I am at today.

The firewall. I bent the bottom and added a flange to the top so there will be no rubber seal. I felt the rubber would not be very air tight. This way will allow me to silicone the backside. Makes the boot cowl very rigid as well.

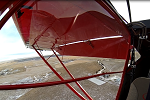
Here you can see how the boot cowl fits. I lowered it as much as possible for the best view over the nose. You can also see how the front and root closer works for the wing. Just needed to be dimpled and riveted.

Here you can see the aft fairing I built. I made it twist so much that it rolls right through lining up with the root wing closure. I also added a splice plate with # 6 nut plates at the joint so the skins fit perfect. That still needs to be riveted in. I have the turtle deck forward screw fastened from the inside, so the fairing fully riveted on.

To Continue....