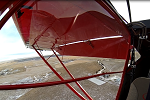
Here is the skylight fitted and finished. I used 3/16 holes, I hope it works well for expansion and does not move around too much. I did the same on the windshield per Steve's instructions. A large hole is a good idea.

Here is how the transition from the windshield to the skylight looks. Steve has done a great job forming the glass. Its a no brainer way to go. I also used 090 for the skylight and bent the close out plate for a tight fit.

I closed off the sides of the seats to allow for fabric. You will notice the required slot for the rudder cable to run through bottom plate.

Here is the front spar attachement. You can see how the rib attached and the front closure plate works. There needs to be a hole above and below the pin for pin removal.

Here is the aft spar attachment. You are also seeing the close out fairing I built for the trailing edge. I still need to put a hole in the texan for bolt removal.

To Continue....